Neural Network Examples

Tensorflow documentation offers useful introductory lessons on developing machine learning models for many uses.

First, we trained a basic classification network using the Fashion MNIST dataset. Like the canonical MNIST dataset, the Fashion MNIST consists of many thousands of 28×28 pixel images and associated image labels. This dataset pairs pictures of clothing items with one of nine class labels.

Below, a sample of images and associated labels is displayed. This plot is generated during the data inspection and preprocessing portion of the tutorial. To preprocess the data, pixel intensity values are scaled between 0 and 1 from the original 0-255.

Before the model can be trained, it must be built with an appropriate configuration of layers. Overcomplicated models are more sensitive to overfitting, so it is important to chose a sufficiently simple design.

## Set up the Model ##
model = keras.Sequential([

# Flatten the 28x28 input image into a 1d array of 784 pix
keras.layers.Flatten(input_shape=(28,28)),

# Create a dense/fully-connected layer with 128 nodes
keras.layers.Dense(128, activation=tf.nn.relu),

# Create a dense/fully-connected 'softmax' layer that returns 10 probability
# scores (one for each class) that sum to 1
keras.layers.Dense(10, activation=tf.nn.softmax)
])

The optimizer, loss function, and metrics of the model are chosen during the compile step. The optimizer (Adam, Stochastic gradient descent, etc.) defines the way that the model is updated .The loss function prioritizes minimization of different types of error. Metrics evaluate the successfulness of a step.

## Compile the model 

# Chose a loss function, optimizer, and metric(s)
model.compile(optimizer='adam',
             loss='sparse_categorical_crossentropy',
             metrics=['accuracy'])

Next, the model was trained on the training data using fit command.

model.fit(train_images, train_labels, epochs=5)

After training, the test data were used to evaluate the accuracy of the model.

test_loss, test_acc = model.evaluate(test_images, 
test_labels)

Finally, the model was used to predict classifications of the test dataset. Below is a plot of the output of my implementation of the model. Each image is displayed with the model’s prediction and confidence alongside the correct label. A bar plot of probabilities for each label is displayed next to the image.

It is notable that these results are not identical to those in the tensorflow documentation, but are very similar. The model builds its own association between the training data and corresponding tags, and may learn slightly different relationships each time it is built and trained.

Our commented implementation of the tensorflow walkthrough may be viewed here.


We also completed an example of sentiment classification in text (positive or negative) and a deep convolutional general adversarial network (DCGAN)designed to generate ‘written’ numbers in the style of the classic MNIST dataset, both using walkthroughs in the tensorflow documentation pages.

In the case of the DCGAN, we were able to observe improvement from patchy white noise to moderately resolved shapes. However, our personal computers lack the computational power to quickly train a model of this type, and we have not yet completed the prescribed 50 epochs.


The same Fashion MNIST example is available for other deep learning frameworks, including pytorch. Progress on these implementations has temporarily stalled because documentation is more limited than for tensorflow and because Google colab does not easily support all of the libraries used in pytorch examples.


Convolutional Neural Networks and U-Net for Image Segmentation

Convolutional Neural Networks: 

Convolutional neural networks (CNNs)  are a type of deep learning neural network specifically geared towards image recognition. CNNs are most commonly used with categorical classification problems. The application of CNNs are widespread, from recognition of cars on roads or faces in photos to teaching a computer to play a video game with an ability that much surpasses human skill. One application discussed in more detail in this post is the U-net CNN, which is designed for biomedical imaging. CNNs  often use dense, fully connected networks, which like many neural networks makes it prone to the common problem of overfitting. For most types of neural networks, overfitting is fixed by various forms of regularization, such as dropout or weight regularization. CNNs instead approach the problem of overfitting by breaking down complex patterns in images into smaller and simpler patterns. It accomplishes this using methods like filtering and pooling, which will be addressed in this post. 

CNNs start by taking a set of training images as input. In each image, pixels may contain a certain pattern or be absent of that pattern. For each pixel, if the pattern is present, it is labeled as a 1, or a -1 if it is absent of that pattern. For instance, if you have an image of  a handwritten single digit number, the place where the writing is present will be labeled as 1, everywhere else as -1.  Take a look at Brandon Rohrer’s image from the Youtube video “How Convolutional Neural Networks Work” below for an example.

These images are given as input to a convolutional layer. In a convolutional layer, the image undergoes a process known as filtering. In filtering, you take a feature pattern, known as a kernel, and compare it to little pieces of the whole image. The size of the feature pattern is known as its kernel size. By multiplying each matching pixel together (matrix multiplication) and summing these values up, you get a value that represents how closely the feature pattern matches the little piece of an image you are looking at. A more positive value is a closer match, a negative value means there is little to no match. Then you move the feature pattern over to the next little piece of the image and perform this procedure again. The movement of the kernel across the image is known as striding, and the stride is the step size of the kernel when walking across the image. Typical strides tend to be 1 or 2. The final image after all the values are recorded is called the convolved feature. In the Rohrer’s video example below, a kernel of 3×3 kernel size is being used for filtering. The little piece that is being compared shows a match of .55. 

After filtering, all of these images are stacked together by the convolutional layer before the process of pooling.  Pooling is when you shrink the image stack by looking at little pieces of the convolved image at a time and selecting the maximum value. This can be better understood by the Rohrer’s youtube image below. Notice how in the selected 2×2 window, the maximum value in this convolved image is 1.00.

All of these maximum values are put together into a new image that is much smaller than the original convolved image. This is a key part of the CNN method of breaking down complex and bigger patterns in images into smaller and simpler patterns, which all helps decrease the chances of overfitting.  Another image from Sumit Saha’s article ” A comprehensive Guide to CNNs–the EL15 Way” is shown below. 

Finally, in many CNNs, there is a layer known as the rectified linear unit (reLu) layer. In this layer, any negative maximum values in the pooled image is change to a 0 in a process called normalization. This ensures that all maximum values in the pooled images are between the range of 0-1, with 1 being a complete pattern match and 0 being no pattern match at all.

All of these convolution layers , pooling layers, and reLu layers get stacked up in a CNN so the output of one becomes the input of the next. Deep stacking is when the layers get stacked several times. Each time through, the image gets smaller (through pooling) and more and more simplified (through filtering). At the very end is a fully connected layer which is able to classify each simplified image into the correct category.

U-Net CNNs for Biomedical Image Segmentation:

U-net is a type of CNN created for biomedical image segmentation. In image segmentation, a digital image is split into several segments or groups of pixels, with each pixel in an image assigned a specific categorical label.  Image segmentation is especially useful for identifying objects and boundaries, like lines and curves. There are two types of image segmentation: semantic and instance image segmentation. Semantic is to label each pixel of an image as a certain category or class. Instance segmentation is slightly more advanced, where the computer is able classify each new occurrence of a class separately. 

In a U-net CNN, the training data is made much larger by breaking images down into patches or groups of pixels. This way, the number of training data is increased from the number of training images given as input to the number of training patches. 

A U-net CNN is named for its U-shaped network architecture, in which the left half is a contracting path that is nearly symmetric to the right expansive path. The contracting path is more of a typical CNN, consisting of two convolution layers with a 3×3 kernel size,  each followed by a rectified linear unit (ReLU)  layer and a  pooling layer with window size of 2×2 and stride 2. The expansive path consists of an upsampling of the images, which replaces pooling layers and helps to increase the resolution of the output. This is followed by a 2×2 convolution (“up-convolution”) and two 3×3 convolution layers, each fol-
lowed by a ReLU layer. In total the network has 23 layers.

The pieces of code below are snippets of an example U-net implementation in tensorFlow on GitHub by Mo Kweon. Like always, the necessary libraries are imported, including libraries already discussed like pandas.

import time
import os
import pandas as pd
import tensorflow as tf

In this code snippet, the kernel size and stride of a convolution layer is being defined.

    return tf.layers.conv2d_transpose(
        tensor,
        filters=n_filter,
        kernel_size=2,
        strides=2,
        kernel_regularizer=tf.contrib.layers.l2_regularizer(flags.reg),
        name="upsample_{}".format(name))

In the code below, you can see the pooling layers being replaced by upsampling for a higher resolution output.

up6 = upconv_concat(conv5, conv4, 64, flags, name=6
   conv6 = conv_conv_pool(up6, [64, 64], training, flags, name=6, pool=False)

Like with keras , every neural network needs to have a defined  loss function and optimizer.

loss = -IOU_(y_pred, y_true)
global_step = tf.train.get_or_create_global_step()

optim = tf.train.AdamOptimizer()
return optim.minimize(loss, global_step=global_step)


Finally, one more snippet of code below shows that for every epoch (round of training), a data sample of some batch_size is trained.

for epoch in range(flags.epochs):
        for step in range(0, n_train, flags.batch_size):

References:

https://towardsdatascience.com/types-of-convolutions-in-deep-learning-717013397f4d

https://towardsdatascience.com/a-comprehensive-guide-to-convolutional-neural-networks-the-eli5-way-3bd2b1164a53

Youtube: How Convolutional Neural Networks Work

https://en.wikipedia.org/wiki/Convolutional_neural_network

https://github.com/kkweon/UNet-in-Tensorflow/blob/master/train.py

O. Ronneberger, P. Fischer, and T. Brox. “U-Net: Convolutional Networks for Biomedical Image Segmentation”. University of Freiburg, Germany. 2015.

Notes from “Deep learning approach to Fourier ptycographic microscopy” by Nguyen et al.

This paper applies the use of convolutional neural networks (CNNs) in Fourier ptychographic microscopy to video capture.

Deep learning approaches to FPM, which computationally enhances the resolution of an image while maintaining a large field of view, have developed to replace the iterative model-based design. The neural net is preferable because once it has defined the relationship between low resolution inputs and the corresponding high resolution FPM output, it can transform input into output directly. The model based approach, in contrast, must iteratively improve its approximation of the high resolution object — a much slower process.

Nguyen et al. train a conditional generative adversarial network (cGAN) to determine the relationship between inputs and FPM output. One sub-network generates predicted FPM output, and the other sub-network attempts to decide whether the output is the ground-truth image or a prediction.

To apply this technique to video reconstruction, Nguyen et al. first assume that the samples on which they train display a sufficient quantity of cells that, within a single video frame, all cell states are represented somewhere. They then choose to train their CNN only the first frame of each video.

When the CNN is applied, frame-by-frame, to the remainder of the video, it is able to reconstruct each cell as it moves through many different states. This is because the original training frame exposed the CNN to all the possible conditions of a cell.

They treat each video frame as temporally independent of preceding frames. Because they know in what way cells of each state are meant to be reconstructed (by training on the many states present in frame 0), they simply reconstruct each state where it appears.

Using transfer learning, they are able to quickly train their model on new types of cells.

This technique for FPM video capture is a faster and more useful strategy than performing iterative FPM on each frame of a video. It has limitations, however. For a sample of cells too sparse or too large to all possible states within a single image, the strategy of only training on the first image of the video is ineffective. For fast moving samples, it will not be possible to collect a full low resolution input dataset before the cells change position.

Introduction to Machine Learning and Neural Networks with keras and TensorFlow

Machine Learning and Neural Network Terminology:

Before diving into examples on using keras with tensorFlow, it is important to go over some key terminology to understand how keras is structured and implemented as a deep learning framework. The goal of machine learning is to develop a model that can find certain patterns in a data set and learn from these patterns to make generalizations about new, previously unseen data. The label, often called the target, is what is being predicted, the intended output. Features are the input, meaning what is being used to help make predictions about data. Labeled examples contain both a set of features and their corresponding label, which is used in the training process. Once trained, the model can be used to make predictions about unlabeled examples, which is the new data.

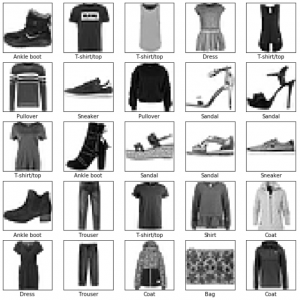
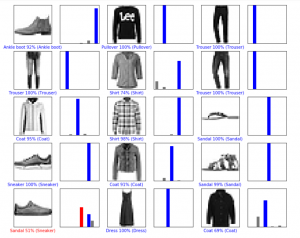
The two most common types of machine learning models are categorical classification and regression. Categorical is when the labels are a set of categories, such as interpreting handwritten single digit numbers as a number 0-9 or matching low resolution images of fashion items as a corresponding category of clothing. Regression models predict a certain value or specified output, like  the price of houses in California or the fuel efficiency of automobiles. 

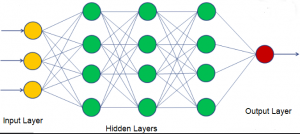
In the case of keras, the model is a neural network consisting of inputs, hidden layers, and a predicted output. Hidden layers are necessary for the model to extract important information about the data and represent the model’s ability to see patterns and connections between features and labels. Each hidden layer consists of a specified number of neurons/nodes, also called hidden units.  Weights are the strength of the connections between neurons of different layers, and can be thought of as a ‘confidence’ level surrounding a certain perceived pattern.

Neural networks find patterns and make generalizations and predictions by being trained on a training data set. Since it is just as important to know how well your model can make accurate predictions on new, previously unseen data, in addition to training sets will be test sets. The test set cannot be included as part of the training set (it has to be new data), but it does has to accurately reflect the trends of the training set.

Another important part of the training process is computing loss. Loss defines how far off the predicted output is from the actual output. During training, the model makes multiple rounds of analyzing the data. Each round is known as an epoch, and this iterative process is what allows the data to learn and develop patterns. Ideally, as the model trains and the number of epochs increases, the total loss should rapidly decrease at first, then flatten out until it converges on a minimum loss. This process of training and minimizing loss is known as gradient descent optimization. The speed at which the model is able to converge on a minimum loss is known as the learning rate. 

There are complications with training neural networks. One important one is the idea of overfitting, which occurs when  the model is more accurate at predicting the training set than on new data its never seen before, and occurs when you train the model too much. Overfitting can be fixed using various methods, which will be discussed later in this post. 

keras with TensorFlow:

The first step before creating any model on tensorFlow is to download the necessary libraries. A common library that is used is pandas, which uses the classes DataFrame and Series to break down numerical data into neat columns and rows.

from __future__ import absolute_import, division,

import matplotlib.pyplot as plt
import pandas as pd

import tensorflow as tf
from tensorflow import keras
from tensorflow.keras import layers

print(tf.__version__)

Next, you must define your training set and data set, separating the features from the labels. The following example is from a categorical model type.

categorical_example = yourdata.categorical_example

(train_data, train_labels), (test_data, test_labels) = yourdata.load_data()

In most cases, some sort of data preprocessing is necessary before training the neural network. For example, if the data is a set of  images of handwritten single digit numbers, with each pixel value in the range of 0-255, we must re-scale this to a range of 0-1. The 0-1 scale will later represent whether the pixel is totally full of writing (1) or completely vacant of writing (0), or somewhere in between. This scaling can be used by the neural networks to find patterns, helping it to identify the image as the correct single digit number.

Once the data is preprocessed, keras builds a model by creating the layers in the neural network. The most common type of model is a stack of layers, the tf.keras.Sequential model.

model = keras.Sequential([
    keras.layers.Dense(16, activation=tf.nn.relu),
    keras.layers.Dense(16, activation=tf.nn.relu),
    keras.layers.Dense(1, activation=tf.nn.sigmoid)
])

In this example neural network model, there are 2 hidden layers and 1 output layer. The Dense stands for densely-connected, or fully-connected, neural layers. The number 16 represents the number of nodes (hidden units) in each layer. Increasing the number of nodes can increase the the capacity for the model to quickly train and find patterns, but can lead to overfitting. The last layer is densely connected with a single output node. Using the sigmoid activation function, this layer outputs a float between 0 and 1, representing a probability, or confidence level of a certain category or prediction. 

Another part of building every model is having a loss function, optimizer, and metrics.  The goal is to minimize the loss function, which measures how accurate the model is during training. The optimizer shows how the model is updated based on the data it sees and its loss function.  Finally, the metrics monitors the training and testing sets. Accuracy is a common tool used in metrics, which measures the fraction of data that have been correctly classified or predicted.

model.compile(optimizer='insert type of optimizer here', 
              loss='insert loss function, often mean_squared_error',
              metrics=[' insert type of metrics, often accuracy'])

Once we have built the neural network, we are ready to train it. A very basic example is shown below, with the number of epochs chosen by the user. Increasing the number of epochs can help the model train but can also lead to overfitting.

model.fit(train_data, train_labels, epochs=5)

We must also evaluate how well the model can make predictions by testing it with the testing data set.

results = model.evaluate(test_data, test_labels)

Creating visuals, such as a graph representing loss by number of epochs, can be a useful tool for analyzing the model and determining if overfitting is an issue.

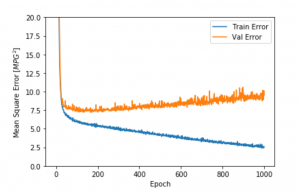
In the graph above, orange is the testing or validation set error and blue is the training error. Notice how error is significantly higher with the test data. This is an example of overfitting.

Fixing Overfitting: 

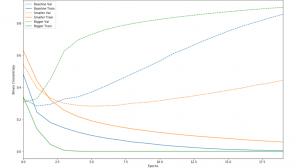
There are multiple ways to fix the common issue of overfitting, in which the model is unable to accurately make predictions about new sets of data. One strategy is to decrease the number of nodes in each hidden layer. While decreasing the number of nodes restricts the computational capacity of the network, it forces the network to only find the most common patterns and make more generalizations, which fits better to new data. The following graph is an example of decreasing and increasing the number of nodes, with blue as the baseline model, green as the bigger model, and orange the smaller model. Notice that the bigger model trains much more rapidly (solid lines), but the smaller model has a much smaller error (dotted lines).

Another way to tackle overfitting is to reduce the number of epochs. Usually, overfitting will occur when there is too much training, allowing the model to find too many patterns specific to the training set. Decreasing the number of rounds of analyzing the data set (epochs) can help fix this problem. The final method is more complex. This method, known as regularization, involves restricting  the quantity and type of information your model can store. Like decreasing the number of nodes, these restrictions force the model to focus only on the most common patterns and to make more generalizations

References:

https://www.tensorflow.org/tutorials/

https://developers.google.com/machine-learning/crash-course/first-steps-with-tensorflow/programming-exercises

https://colab.research.google.com/notebooks/mlcc/intro_to_pandas.ipynb?utm_source=mlcc&utm_campaign=colab-external&utm_medium=referral&utm_content=pandas-colab&hl=en#scrollTo=WrkBjfz5kEQu

https://www.datacamp.com/community/tutorials/neural-network-models-r

Machine Learning Notes

Classification

  • A linear regression model generates the decimal probability of an event occurring. To map this probability to a binary category (the event will or will not occur), you must define a classification threshold

o   The classification threshold decides which probabilities are associated with one and which are associated with zero

  • You don’t always need a classification threshold. If you want to predict the probability of rain, you can just return the prediction as the decimal likelihood of rain.
  • If, however, you want to predict if someone will or will not need a raincoat, you’ll need to decide which rain likelihoods should correspond to “raincoat” and which correspond to “no raincoat”

o   Threshold tuning considers the consequences of different types of incorrect predictions

  • True positive means the model makes a correct positive prediction
  • True negative means the model made a correct negative prediction
  • False positive means the model incorrectly predicted the outcome as positive
  • False negative means the model incorrectly predicted the outcome as negative
  • False positives and false negatives have different consequences
  • It is better to bring a raincoat and not need it (false positive) than to get caught out in the rain without one (false negative)

Prediction Bias

  • Prediction bias occurs when the average of all predictions made by a model is not equal (or approximately equal) to the average of the dataset

o   Ex: if 10% of all dogs in a shelter are labs, the model should predict that a dog is a lab ~10% of the time

o   If avg. prediction – avg. observation is not zero, the model is biased

  • Calibration layers to correct bias are a bad idea

o   It is possible to correct bias with brute force (for an 8% bias, add a layer that brings down the prediction mean by 8%)

o   This isn’t good because prediction biases signal that something is going wrong inside your model – it’s important to identify the actual problem instead of painting over it

  • Overly regularizing data, using biased training data, or training on very noisy data are common causes of prediction bias

Regularization

  • When sparse features are crossed, the model size becomes needlessly large, slowing down operations and using up memory

o   Extraneous weights should be made equal to 0 to save space and improve speed

  • L1 regularization penalizes the absolute value of the sum of all weights in the model

o   It causes some weights to be zeroed out completely, unlike L2 regularization which works to keep weights near zero but does not eliminate them entirely


From Google’s machine learning crash course

Deep Learning Frameworks Comparision

Many deep learning frameworks are available to accomplish the same task in slightly different ways. Below, we summarize some key points from the most popular frameworks.

Tensorflow is the most widely used deep learning framework. It is developed by Google. Tensorflow is highly documented and Google offers extensive tensorflow-based machine learning training lessons and exercises for beginners. Tensorflow has its own visualization tool, tensorboard.

Tensorflow is not as fast as some other frameworks and has a reputation for being very complicated for beginners.

Pytorch is the second-most popular framework, after tensorflow. Pytorch is the python based variety of a deep learning framework called Torch and is developed by Facebook. Pytorch is known for being fast and efficient and is popular with researchers. It is more intuitive for new users than tensorflow.

Pytorch documentation is limited, and it does not have any inbuilt visualization tools (e.g. tensorboard)

Keras is a  simple, high level library developed primarily by a Google engineer named François Chollet. It works on top of frameworks like tensorflow and makes developing simple neural networks much easier for beginners.

Because Keras is meant to abstract the details of more in-depth libraries, it offers less control in building models.

MXNet is an effective framework, highly scalable framework used by AWS and other industry giants.

Documentation is more limited than other languages, which makes it a poorer choice for beginners.

Other options include Caffe (or Caffe2), Microsoft Cognitive Toolkit, and Deeplearning4j. All of these options are high performing but less well documented.

Most of the canonical choices of machine learning framework have comparable performance. Differences in speed and efficiency do not seem marked enough between the frameworks to strongly prefer one or another on that basis.

Instead, because our lab is not experienced in machine learning, we think it would be best to choose a well documented language with an active support community. We have explored Google’s tensorflow-based machine learning crash course for an introduction to the main concepts of machine learning and an overview of tensorflow use. Using keras with tensorflow may be a good choice for our collective skill level, with the option to transition to regular tensorflow for finer control as we become more experienced.

Confocal Imaging

Confocal imaging is an alternative to standard optical microscopy, such as conventional widefield microscopy or even Fourier Ptychographic microscopy. It poses an advantage over these forms of microscopy when imaging thick, fluorescent biological samples, such as living cells or tissues. Living cells and tissues are often stained with fluorescent dyes to better view them in a low contrast background, but this poses certain challenges. When imaged by a conventional form of optical microscopy, fluorescence emitted from other parts of the specimen that are not being imaged can interfere with the resolution of cells or tissue that are in focus, causing a phenomenon called “out of focus” glare. This is especially prominent in specimens thicker than 2 micrometers.

Confocal imaging is able to minimize out of focus glare and has an increased resolution for florescent labeled biological samples as opposed to conventional optical microscopy.  Unlike widefield microscopy, which illuminates the entire biological specimen in uniform light, confocal imaging utilizes a laser that emits a focused beam of light to one particular point of the specimen. This light is scanned across the specimen in optical sections, leading to increased resolution without physically separating the specimen into sections, which is an invasive technique that would be required for widefield microscopy for increased resolution. By focusing the source of light on a specific point of the specimen, the illumination intensity drops off sharply for the rest of the specimen that is not in focus, reducing out of focus glare.

The drawback of confocal imaging is it can have poor temporal resolution. This is due to the fact that the light beam is focused to a small point less than a cubic micron is volume, so analyzing the whole specimen would require multiple images as the laser beam analyzes each optical section. In addition, in order to maintain better images for confocal imaging, it is optimal to reduce the power of the microscope when a high numerical aperture is being used, but this limits the speed of acquiring the image.

A possible approach to increasing the temporal resolution of confocal imaging while maintaining a high resolution would potentially be to implement a deep learning algorithm which could speed up the image acquisition time or reduce the number of images required for the given specimen. Attempts with deep learning have been made, such as UCLA’s technique of transforming  confocal images into a super-resolved image that matches the resolution of stimulated emission depletion (STED) microscopy. This super-resolution of confocal imaging uses a deep neural network that successfully increases temporal resolution while maintaining or even increasing the space-bandwidth product.

References:

S. Paddock, T. Fellers, and M. Davidson. “Introductory Confocal Concepts.” MicroscopyU (2019).

“Confocal Imaging.” University of Wisconsin (2019).

H. Wang, Y. Rivenson, Y. Jin, Z. Wei, R. Gao, H. Gunaydin, L. Bentolila, and A. Ozcan. “Deep Learning Achieves Super-Resolution in Fluorescent Microscopy”. University of California, Los Angeles. 1-6. (2018).

Note on Arduino Use

Before programming

Use the tool tab on the top to check whether we are using the correct breadboard, processor and port type. Basic program tutorials are written inside Arduino itself, so if we need any reference, we can simply open the examples for help.

Programming Syntax

Initializing the pins

  • We first have to decide whether a pin is an input or output by writing pinMode(#num, OUTPUT) or pinMode(#num, INPUT).
  • The syntax for the function is

void setup() {

}

Loop function

  • Loop function iterates forever until it stops and its syntax is:

void loop() {

}

Delay function

  • delay(time)    NOTE: time is in milliseconds

Turn on/off LED

  • Turn on the light: digitalWrite(#pinnum, HIGH)
  • Turn off the light: digitalWrite(#pinnum,LOW)

After programming

After programming the codes, use the sketch menu on the top bar and click the compile button. After compiling, we click the upload button to transmit  our program to the breadboard to execute our code.

Notes on “Illumination Pattern Design for Single-Shot Fourier Ptychographic Microscopy” by Ganapati and Potential 2019 Extension

In Fourier Ptychographic microscopy, multiple illumination patterns of light emitting diodes (LEDs) are used to capture several low-resolution images. The images are then combined with an algorithm to create one single high resolution image with a high space-bandwidth product (high field of view and high resolution). The problem with Fourier Ptychographic microscopy is it’s slow (poor temporal resolution).

Professor Ganapati’s 2017 and 2018 research has been to increase temporal resolution without sacrificing the high space-bandwidth product using a deep learning approach.  In the training process of this deep neural network, each low-resolution image stack is matched by a high-resolution image, which is fed as input to the neural network. The output is the predicted high resolution reconstructed image, which is compared to the actual high resolution constructed image. The neural network can learn from this comparison and optimize the image to minimize these differences.

With this deep learning approach implemented, the process is much faster, allowing for increased temporal resolution without compromising the space-bandwidth product. The procedure requires only a single low resolution image using one LED illumination pattern for a resulting high resolution image,  as opposed to several low-resolution images per each LED illumination pattern. 

A possible extension for the 2019 summer would be to implement this deep learning approach of microscopy to the imaging techniques used in flow cytometry. Flow cytometry, which analyzes large populations of cells and rapidly sorts out targeted cells in a given sample, could greatly benefit from increased temporal resolution.  Efficient imaging in biological samples is crucial, as often billions of cells will need to be analyzed, perhaps with only 10 of them being targeted cells. The aim is to further the efficiency of cell sorting in flow cytometry by applying a deep learning microscope in order to increase the average cell throughput, all without sacrificing the space-bandwidth product.

References:

S. Gorthi and E. Schonbrun, “Phase Imaging Flow Cytometry using a Focus-Stack Collecting Microscope,” Optics Letters 4, 707-708 (2012).

Y. Cheng, M. Strachan, Z. Weiss, M. Deb, D. Carone, and V. Ganapati, “Illumination pattern design with deep learning for single-shot Fourier  ptychographic microscopy,” Optics Express 2, 644-645 (2019).

C. Chen, A. Mahjoubfar, . Tai, I. Blaby, A. Huang, K. Niazi, and B. Jalali, “Deep
Learning in Label-free Cell Classification,” Scientific Reports 1-2 (2016).